Friday, October 25, 2013

Spraypaint a Pumpkin Through a Doily


Using a paper doily and spray paint to make a fancy pumpkin. by joanne

This pin goes to Indulgy, which is an inferior version of Pinterest.  That's annoying - but what's worse is that it doesn't even go to the correct Indulgy post, it goes to a black pumpkin with silver glitter on it.

Okay, so that's enough to qualify for a post here, but then there is the pin's description, which is also erroneous.  This pumpkin project is actually from Better Homes and Gardens, and they did not use spray paint; they used a stencil brush and paint.

So there you go.  

Wednesday, October 23, 2013


Spray paint some dollar store fangs for great card holders with person's name on them and/or what the food on a buffet is. 

Again with the silver spray paint.  It's nearly as popular as glow sticks.  If someone finds a way to combine silver spray paint and glow sticks, they'll be able to take over the world.  Or at least the corner of the world occupied by Pinterest crafters (a not inconsiderable portion).

On to this particular pin.  The picture here is not showing cheap plastic fangs that someone painted.  These are from the Pottery Barn.  They don't appear to carry them any longer.

I'm not saying you couldn't do this, but I am saying that what you're seeing in the picture are professionally produced silver fangs, not Dollar Store fangs that someone gussied up on her own.

If you can't duplicate this with silver spray paint, you might try painting the teeth black and then using silver Rub n' Buff.

Monday, October 21, 2013

Chrome Pumpkins


Chrome metallic spray painted dollar store pumpkins!

These look great.  Very shiny, very metallic.  Similar to the Mercury Glass Pumpkins that I posted about before.  Silver pumpkins are apparently very "in" this year.

Lets get down to brass (silver?) tacks:  This picture is misleading.  It was obviously taken soon after these pumpkins were sprayed.  After the paint cures, the shine is diminished:


That's pretty much it - if you use metallic spray paint on Dollar Store (or probably any) plastic or foam pumpkins, they will be a little dull.  Still pretty, but the pin should use this picture because it's more realistic.  

Friday, October 18, 2013

Masks With Glow Sticks


masks + glow sticks = great Halloween inspiration

Nope.  Not glow sticks.  It's never glow sticks.  

I feel like Dr. House.  "It's never Lupus."  I mean, how many times has a glow-in-the-dark pin ACTUALLY been done with glow sticks?

This looks like a case of someone either making a bad guess as to how this picture was achieved, or they actually did read through the description and decided that glow sticks would probably work just as well, so they put that in their description.

These masks are being illuminated from within by electric tea lights:


If you want to see how they did it, there's the link.  It's not hard, but it's not glow sticks.  Anyone who looks at the pin should be able to tell by the radiance and color, but you never know what people will believe. 

Someone should try it with glow sticks and post their picture.

Wednesday, October 16, 2013

Glass Block Jack O'Lantern


Square glass votive from Michaels filled with string lights (battery operated ) felt cut-outs for the face and wrapped in orange tulle and topped off with a black bow and black pipe cleaners, corkscrewed. CUTE! :)

A Clear glass block from Michael's or any craft store, paint or glue black fabric on for the face, add battery lights or a candle, then a bit of tied up orange tulle or chiffon.

light block jack-o-lantern. Clear glass blocks at Michael's or any craft store.

This looks like a great do-it-yourself project.  And it very well may be a great project, but the pins with this picture (so far) do not lead to a tutorial.  The links in those pins lead to....nowhere.   

For the first pin I found, the link returned "Blog not found." 

For the second pin I found, the link returned "Page not found." 

Same result for the third as the second.  It's as if this picture is cursed!  

Even when I eventually tracked this picture down to an Etsy seller, that page disappeared after I bookmarked it for use in this post.  I'm guessing that Etsy's new business plan was unsavory to this seller and she decided to move her shop.  She's set up at 805 Design Co now, if you're interested in her creations.

Those broken links bother me.  They bother me because I suspect that those bloggers are the type of people who take pictures they don't own and pretend to have done a project that they have never actually attempted.  If that's the case, then I'm glad their sites/pages are gone.

I mean, what happens?  You do a Google search, find something that looks cool, and then just pass it off as your own with a little creative writing?  That sucks.

Plus, they're just wrong.  That is not a "votive" (nor is it a "votive holder").  It's not using black fabric or felt cut-outs for the face.  

That is an acrylic block with vinyl on it.  

Let's have a little more honesty in our online crafts.  I'm not saying it would be impossible to reverse-engineer this project, but give 805 Design some credit for coming up with it and also creating a picture that apparently appealed to everyone.  Not everyone can photograph their creations in a way that inspires others.  Not everyone can come up with the idea for a craft like this, so it doesn't matter how easy it looks to you - you didn't think of it.  Give the person who DID think of it their due.

Okay, rant over.  Have fun making your acrylic block jack o'lanterns.  Me personally?  I'd go with the thin acrylic block, battery powered LEDs, vinyl mouth and eyes, orange tulle, and some decorative Halloween ribbon.  Maybe a few black and orange pipe cleaners wrapped around a pencil to coil them nicely.

Monday, October 14, 2013

Glowing Bubbles


Cut open glow sticks & pour them into bubble solution. Glow in the dark bubbles. Summer nights here we come!

There are a few reasons why this pin doesn't work as described.  First, some kinds of glow stick solution mixed into bubble solution change the properties of the bubble solution so that you cannot make bubbles with it.  Second, even if you manage to get bubbles, they are unlikely to have enough of the glow solution to make visibly glowing bubbles.  The bubbles are just too thin to contain enough glow solution to appear to the naked eye.

Here's a video of someone attempting to mix a glowstick and bubble solution.  They did get the bubbles to form, but they don't appear to be glowing.   They very well may show up with special photography equipment in a very dark room, but to the naked eye and the camera they used, nothing showed up.  However, the experimenters did note that when the bubbles landed and popped, the pool of solution did glow.

Finally, the picture that is on this pin is NOT of someone dumping an opened glow stick into a jar of bubble solution.  This picture is of someone attempting to use Super Miracle Bubbles® GLOW FUSION™ Bubble Solution.  This product is similar to a glow stick solution, in that you mix the parts together to get a chemical reaction that causes the glow.

However, even this solution, which is designed to create glowing bubbles, failed to produce any visible-in-the-dark bubbles.  Those people had the same experience with the invisible bubbles popping and then the solution from the popped bubble would be concentrated enough for the glow to become visible.

Maybe the best way to get bubbles that you can see in the dark would be to get some highlighters, mix their contents with bubble solution, and blow bubbles under a black light.

Word to the wise - glow sticks have a glass capsule inside of them; this is what you break to release the activator.  If you cut open a glowing stick, you risk also releasing glass shards.  Be careful.

Friday, October 11, 2013

"Glow in the dark" drinks. Again. Moar.


Glow in the dark drinks

Again with the glowing drinks.  Which don't really "glow in the dark" so much as they fluoresce under black lights.  If this stuff really glowed in the dark, you would NOT want to ingest it.

The secret here is that tonic water (which contains quinine) reacts like this when you hit it with a black light.  That's it.  Oh, and I think that the starts here are Jell-O Jigglers made with tonic water as well.

Tonic water isn't something everyone enjoys - it's bitter.  So if you try this, maybe go easy on the tonic water; it shouldn't take much to get the desired reaction.

Wednesday, October 9, 2013

Say What?


Add paint and glue to dryer lint.

I had to include this one, even though it's not false or even misleading.  What it is, is incomplete.  Add paint and glue to dryer lint?  WHY?  Who is doing this?  Why are they wearing gloves and mixing up paint and dryer lint in a perfectly good bowl?  

I had to know.

Turns out, this is a recipe for fake moss.  You mix up some green paint with your lint, and then while it's still tacky you press it to whatever you're trying to add moss to (tombstones, statues, creepy trees).  

So there you go.  If you're doing Halloween props and you need some fake moss, grab some dryer lint and some paint and go to town.  

Monday, October 7, 2013

Milk Jug Ghosts


Line your driveway or walk way with these cute milk jug ghost. Draw a face on the jug with sharpie, cut out the bottom but make sure it can still stand, put fake or real candles (scented if you want) on the ground, light it on your driveway of walkway, carefully set your jugs on the ground, and you have milk jug ghost!!!

Whoever decided to make this pin decided to upload a picture directly to Pinterest rather than linking to the source.  Which is here, and clearly defines the lights inside those jugs as a "string of 50 clear low-wattage holiday lights" just in case the photo, which clearly shows the string of lights inside the jugs, isn't enough for you.

The way this pinner is suggesting you do it, you will not only not get this look, you'll also be asking for melted plastic and possible fires (but scented fires, so does that make it better?).

Friday, October 4, 2013

Halloween Window Clings In Dollar Store Frames


Use dollar store frames with window clings! Could use different clings for each holiday!

Well, these are not technically Dollar Store frames; they came from Walmart (close enough, though, right?).  That's not what's wrong here.  What's wrong is that those are not window clings.  Those are vinyl.  I'm not saying window clings are a bad idea, but they sure would not look as nice as that vinyl.  And good luck reusing vinyl for different holidays.  

Here's the source of the project, and she has created a very nice PDF of instructions for people who are interested in creating this look.

If you can find the right size of window clings and you don't mind those clear borders that all window clings seem to have, more power to you.  If I was doing it, vinyl would definitely be the way to go.

Wednesday, October 2, 2013

Mercury Glass Pumpkins


'Looking glass' spray can transform pumpkins into these gorgeous centerpieces! Use a white spray first to get the best effect. Oh, I'm soooo doing this!!! I'll use fake pumpkins from the craft store so they'll last longer

designs that inspire to create your perfect home: 20 Halloween pumpkin craft idea: Easy last minute!!

Things Crafty Mixed-Media art crafts sewing journalling Videos Podcast Make Your Own Mercury Glass Item | Things Crafty crafting videos tutorials reviews books products demos and Podcast

These are all great.  One of the pins quoted above came from Ruffles and Such, where she wrote, "But how is this for a DIY project? Spray paint (or silver leaf) those pumpkins and look how glamorous they can look! I could really get into that kind of pumpkin."

I'm not sure what kind of farmer's markets or pumpkin patches these people are going to, but it seems pretty obvious to me that the pumpkins in that picture are not real pumpkins that have been spray painted or covered in silver leaf.  Nor are they Dollar Store pumpkins.  And they definitely are not someone's homemade Mercury Glass pumpkins.  These are Pottery Barn pumpkins.  The only way this is an "easy last minute" pumpkin craft idea is if your idea of a craft is running to Pottery Barn.  And you know, if that's your thing, I'm not gonna judge.

For the rest of you who want a little more "Do It Yourself" in your pumpkin craft project, you have a few options.

You can try to use Dollar Store pumpkins:


It's a fairly inexpensive way to go, but I think we can all agree that this is not the look most people are going for.


You can use looking glass spraypaint on the inside of a glass pumpkin, and you'll get something like this:


Not bad!  A little more expensive than the Dollar Store route, but closer to the original desired look.


Or you could break all the rules of looking glass paint, and use it on the OUTSIDE of a ceramic pumpkin:


Folks, I think we have a winner!  It may not be shabby-chic enough for some, but I think that's a really nice effect and a lovely addition to anyone's Fall decor.

Monday, September 30, 2013

Fairies in a Jar


How To Make Fairies In A Jar This is something everyone will love you can just imagine the look on your childs face when they see this and its something they will never forget so its worth a little work on this one. FAIRIES IN A JAR DIRECTIONS: 1. Cut a glow stick and shake the contents into a jar. Add diamond glitter 2. Seal the top diy

I love so many things about this one.  The misspellings on the picture, the poor punctuation in the description, the instructions to shake hard. . .It's all comedy gold.

It's kind of strange how this very specific description shows up all over the web.  Try it; Google "something they will never forget so its worth a little work on this one."  It comes up in all sorts of places.

The earliest mention I could find was from May 2012 on KWNR.  Who knows where it came from before that.

Something worth mentioning: Diamond glitter is a specific type of glitter.  Most of the people who have tried to recreate this pin have been using regular glitter.  Diamond glitter is ground glass rather than normal glitter.  Theoretically, ground up pieces of glass would give you more of a sparkly prismatic effect, where the people using regular glitter have wound up with dark spots where their glitter blocks the glowing light.

This may be why the instructions say to "seal" the top of the jar, rather than just "put the lid on."  Yes, glitter is the herpes of the craft world and you don't want it getting out, but if you're doing this with children, probably the last thing you want is a bunch of teeny glass shards and probably-toxic glow stick fluid getting loose on your kids.

Back to the pin.  No matter what kind of glitter you use, you're not getting the result in that picture.  It's a beautiful piece of work, but it's not something you can replicate in real life with a glow stick and some glass dust.

The good news is, there IS a way to make a jar that has little glowing spots in it.  To do it, you need to use glow in the dark paint (and no, not the kind you make by using the liquid from a highlighter - that is not "glow in the dark," that is "fluorescent").  

Check out this tutorial by Panka for a very nice illustration of how this can work.  

Friday, September 27, 2013

Make Your Own Sea Glass


make your own sea glass. Glass in jar with sand and shake.

This pin is one of those special ones that goes right to the original source of the picture (yay!), but which then has a very misleading comment on the pin.  In this case, the poor flickr photographer resorted to putting up a comment on her picture:

"Update: Hello to anyone looking in from Pinterest - sorry to disappoint you but my photo has been linked wrong - this is not where you find out how to make it, this is REAL seaglass I found myself as I am lucky to live near a beach where it washed ashore. If you wish to make it - look elsewhere, as I don't have the instructions all I can imagine as it is very labour intensive to do it. Thanks for liking my picture though :-) lisaluvz"

I feel sorry for Lisaluvz.  Someone linked to her picture, put on that bit about making it yourself, and then Lisa got to deal with the fallout of not living up to those other pinners' expectations.  

Real sea glass is the result of both a chemical and a physical process - yes, the particulates in seawater rub against the glass, causing tiny scrapes that help "frost" the glass and take away its glossiness, but there is also a chemical component (like frosted glass).  

You might be able to approximate sea glass with a rock tumbler, but I'm not sure how well it would work.  Or you could just try mixing Elmer's Glue with food coloring and see how that works out for you (that should probably be its own post!).

Wednesday, September 25, 2013

Lace Light Bulbs


spray paint through lace on a bulb.

DIY light bulb decor. Just put lace over the bulb and spraypaint

Spray paint through lace over a light bulb or clear Christmas ornaments.

This is one of those things that looks like it should work, but if you take a closer look, you realize that the logistics of spray painting through a doily that is laid over the round and variable shape of a light bulb would probably not look this great.

And you'd be right - despite what most of the pins say, this picture is not the result of spray painting a light bulb through a doily.  These are called Arquette lamps and they are (or were) for sale on Plumo.  It looks like they're gone now, but that's the original source of this image.

In addition to the probable failure if you tried to recreate this pin due to the picture not truly portraying a light bulb that has been spray painted through lace, the idea of using spray paint on a light bulb and then still using that light bulb for lighting is probably a bad idea.  Per a commenter on Polyvore:

"Don't you need a special kind of paint to do this to make sure that there isn't a fire hazard? I did something similar to this once with regular spray paint and it almost burned a hole in my ceiling...."

Words to live by. Don't burn your house down in the name of style.

Monday, September 23, 2013

Bridesmaids Shirts With the Number of Years You've Been Friends


Bridesmaids shirts with the number of years you've been friends. This is awesome!

Okay.  Don't click through the original pin, as it seems to go somewhere you don't want to go.  It looks like a suspicious redirect.

Now that that's out of the way, can I get an answer as to why showing the number of years you've been friends is "awesome?"  Because someone with a one or a zero has got to be feeling awesome about this idea.  "Hey, I just met you, and this is crazy, but I need bridesmaids, so putonthisembarrassingshirt maybe."

No, I am not a lyrical genius.  We cannot all be Kanye.

Moving on.  If you saw this pin and your first thought was "OMG PERFECT!" then you are bad and you should feel bad.

I tracked down the source of this image and thankfully, that's not what's going on (as you have probably already figured out).  Those numbers are the date of the wedding, which is actually very cute, as long as everyone can remember what order to stand in every time there is a picture from the rear.

Also, these shirts are much better than matching bikinis that have rhinestones on the tushie spelling out "maids,"  I am definitely Team Shirt.

Friday, September 20, 2013

Thrifted Dresser With Wallpaper Inside


Thrifted dresser with missing drawers, add shelves, wall paper inside. Very cute!

First of all, let me point out that this pin commits that cardinal sin of Not Linking To The Right Blog Post.  The URL is for the main blog itself, which means if you're hoping to find the entry for this project, you must figure out how to search that blog (or you could just go page by page forever).  Please.  PLEASE!  When you're out on the web and you see something cool to pin, make sure you click to the exact entry you're looking at, not a landing page or even a page from a search.  Those will be frustrating pins for those who come after you.

Aside from that faux pas, what else is wrong with this pin?  Pretty much everything.  I tracked down the correct post, and found that this is not a thrifted dresser; it was a hutch.  There was no need to add shelves because they were original to the piece.  I mean, who has a dresser or chest of drawers that tall anyway?  Or a dresser with that kind of molding around the top?  

Also, that's fabric, not wallpaper.

Not that finding an old dresser and giving it a similar makeover with shelves and wallpaper (and crown molding, base molding, etc) might not work, but that's not what this picture is showing.  If you're looking to replicate this pin, best to start with a hutch; it'll be a lot less work.

Wednesday, September 18, 2013

Listerine Foot Soak


This is crazy. Mix 1/4 c Listerine (any kind but I like the blue), 1/4 c vinegar and 1/2 c of warm water. Soak feet for 10 minutes and when you take them out the dead skin will practically wipe off.

This one has been getting repinned a lot.  Sometimes the pinner puts the entire recipe in the pin, and sometimes they leave out the Listerine, which is interesting because on all of the source sites, that's one of the main ingredients.  The other main ingredient being that perennial favorite for practically everything, vinegar.

There are a few things going on here.  First, the recipe itself is odd.  If you mix 1/4 cup of Listerine, 1/4 cup of vinegar, and 1/2 cup of warm water, you have one cup of liquid.  That's not remotely enough for a foot soak.  Not even if you're doing one foot at a time.  So there's that.  

Then there is the note from the recipe saying that they prefer using the "blue" Listerine.  Well, that's giving some folks unintended consequences, like dyeing their feet blue.  Others had better luck with the soak, claiming their feet did feel softer, but that the dead skin did not wipe off as advertised.

The part that the pin gets correct is the very first sentence.  "This is crazy."  Yes, yes it is.

Monday, September 16, 2013

Golden Animal Magnets


Buy plastic animals from dollar store, cut in half, spray paint gold, and glue magnet on bottom.

This is one that looks like it might actually work, but I haven't seen anyone who has done it.  The picture for this pin is from Uncovet, where this set is no longer available for sale.  So we're featuring this pin purely for the "you used a picture that is not what you said it was" reason.  I'm sure the original poster was just making a personal note, but when these things get seen and repinned a hundred times by others who don't read very thoroughly (or notice where the pin actually leads to), it can snowball into an avalanche of disappointed pinners.

The good news is, here's why I think this pin can work (though not with the gold spray paint that the pin recommends):  Heodeza did something similar with plastic animals and a gold metallic pen.  Her results really look nice and I think you could make a reasonable attempt at recreating Uncovet's magnet set if you followed her lead. Go take a look at what she was able to do; I was impressed.

One thing to think about if you attempt this pin is that these magnets sit flat against the surface they are on - to replicate Uncovet's magnetic animals, you will have to figure out a way to set your magnet into the back of your half-animal (and if your animals are hollow, that presents its own set of challenges with building it back up to seat the magnet properly).

Friday, September 13, 2013

Alexandria's Genesis

Elizabeth Taylor didn't have to shave? (Warning: Bad Language at Link)


No shaving, no periods, purple eyes?! Are you kidding me? This sounds like the best deal ever!

This is one of those pins that you come across and think, "...Really?"  I mean, who would fall for that?  

Lots of folks, apparently, who would probably be very disappointed to find out that it's a false mutation.  

The best part about this pin, is that unlike other pins where it's very hard to track down who first made the mistake (or who first made up the deception), there is an entire web page devoted to explaining the origin of Alexandria's Genesis.  It's a really good read, and I recommend that if you thought even for a moment that Alexandria's Genesis was a real thing, you go peruse it.  Here's a sample:

"Nearly 15 years ago (circa 1998), I was a huge fan of Daria, MTV’s favourite high school cynic. I had also discovered fan fiction then, and when I found some related to my favourite show, I wanted to leave my mark.
I just didn’t know my mark would be the size of a logic-bomb crater."

So there you have it; Alexandria's Genesis is just the fantasy of a fanfiction writer that took on a life of its own through the wishful thinking of others.

Wednesday, September 11, 2013

Water Marbles


Water marbles! Crazy how a few kitchen ingredients will make these. Weird, I can't wait to try. Science party?


How to make "Water Marbles" from household ingredients - COOL science experiment!


Water marbles! Crazy how a few kitchen ingredients will make these.


So.  Water marbles.  This is an extremely popular pin in many different incarnations.  And it's easy to see why - the photos are beautiful and the idea that you can make these yourself is intoxicating.  And unlike a lot of other pins that rely on people's optimism to fool them into belief, this pin has a YouTube video to back it up!


The hard truth is, this isn't real.  Someone went to a lot of time and effort to create a video (much like the glowing Mountain Dew hoax) to mislead people into believing you could cook up water marbles in your kitchen.

The water marbles you see in this video are really hydrogel beads - they start out as tiny bb-sized, hard pieces of superabsorbent polymer, and when you soak them in water, they absorb it and swell up to a squishy water ball.  You can even color them by adding colors to the water when you soak the beads.

I think the best part about this fake pin is that some of the pins go straight to ChemSpider's site, where Antony Williams handily debunks the whole thing.  People!  Pin responsibly!  Click through the pins you're adding to your boards to make sure they're legitimate.  You'll save yourself and countless others the heartbreak of attempting a really cool kitchen experiment like water beads, which was doomed to failure before it began.

Monday, September 9, 2013

Glow in the Dark NOT Paint: The Glowing Drink


crazy! it's a glow-in-the-dark aurora borealis cocktail you can actually make!

The more I look around, the more I notice that Pinners adore "glow in the dark" pins.  Glow in the dark paint, glow in the dark fingernail polish, glow in the dark garden stones, glow in the dark planters, glow in the dark bubbles, glow in the dark glitter jars, glow in the dark Mountain Dew. . . You could probably create a pinterest clone site devoted solely to glow in the dark pictures and crafts and it would win the internet.  Especially if it involved glow in the dark cats.

The thing is, most of the glow in the dark pins aren't actually pictures of things that glow in the dark.  The picture above is clearly photoshopped, but that doesn't stop people from hopefully pinning it.  The drink in question, the Aurora Borealis (or Jungle Juice), really does fluoresce under a black light.  In regular light it looks pink, and when the black light comes on it glows blue.


This may be a good time to get into the way certain kinds of luminescence work.  Luminescence is what it's called when something gives off light.  The type of luminescence that Pinners seem to love the most is photoluminescence, which means that matter absorbs energy and then emits light either immediately or as a delayed process.  

When you have a delayed release, you have something that glows in the dark.  Glow in the dark paint and other items slowly let go of the radiation they have absorbed (I'm talking about light here, not nuclear fission), and that energy is seen as visible light.  When the energy is gone, the object stops glowing.  This type of luminescence is called "phosphorescence."

When the glow happens immediately, as soon as you apply the energy (and it disappears pretty much as soon as the energy source is shut off), you have fluorescence.  This is what is happening with the Aurora Borealis drink.  The black light hits the drink and the drink absorbs and then re-emits that radiation.  

So this pin really has a couple of deceptions going on.  First, that any drink you could mix up could look like that picture, and second, classifying a fluorescent drink as "glow in the dark."  Once the black light is off, that drink stops "glowing."  

I just mention this so that people who were not fooled by the photoshop job but who may have fallen for the "glow in the dark" part will know - you can mix up this drink and expose it to bright light all day, and once those lights go out so will the drink.  It needs a black light to work.

Friday, September 6, 2013

Glow in the Dark Paint: Part 1 - Path of Glowing Stones

There are a LOT of pins about adding glow in the dark paint to outside features.  Today's post addresses the infamous Glow in the Dark Path.


Line a pathway with rocks painted in glow in the dark paint. During the day they “charge” in the sun and in the evening they reflect the stored light. Rust-Oleum Glow in the Dark Brush-on Paint.

or

glow stones…..glows at night after soaking up the sun all day omg

It's hard to know where to start with this one.  So many people have pinned it, seeming to believe that these really are stones that have been painted with glow in the dark paint or that maybe these are special glowing stones that are available for purchase.  But you just need to look at this picture to recognize that this effect is not attributable to glow in the dark paint, nor are the rocks glowing from within.  

Look at how the light is focused on each stone.  It's brightest in the center and fades out toward the edges, which if the rocks were glowing from within would make sense.  But then there are the pebbles around each stone, which are showing some spillover illumination.  If that's from the stones, why isn't it consistent around each stone?  And why are those pebbles sometimes brighter than the edges of the stones that they are bordering?

Then, check out the gate and urns at the end of the path.  If these stones are glowing, why is that same "glow" coming off of the gate?  Surely no one believes that the glowing stones are powerful enough to light up that gate.  

And even without that sort of analysis, the color is a dead giveaway.  Glow in the dark paint does not give off this color.  Over at Observations, they did a comparison between the glow in the dark paint from Krylon and Rust-Oleum.  They even delved into the ingredients that cause the glow in the dark effect (Strontium Aluminate and Zinc Sulfide).  Both of those paints (which each use Zinc Sulfide) glow green as they release the energy stored from being exposed to light.  But whether you are using Strontium Aluminate or Zinc Sulfide, it looks like you cannot achieve the warmth in the pinned picture through glow in the dark paints.

It's probably worth mentioning that even if you did want to paint your stones so that they would glow a spooky green for about two hours after sundown, for at least the Rust-Oleum paint, the directions say it's for interior use only.

So how was the picture in the pin achieved?  It's a technique the photographer used called "Painting With Light."  He walked along the path and used a handheld light to "paint" each of the stones, then the fence, then the urns and gate, and finally walked back to the camera to close the shutter.  Because of the way the settings were done, he never appears in the picture - he was moving too quickly to be captured.

The good news for people who do want a glowing pathway is that there are companies that sell glowing stones.  And interestingly enough, one of the pins that has a picture of that glowing path above has the URL to Ambient Glow Technology.  If you go to their Gallery page you can see a set of stepping stones that really do glow in the dark, and per the claim on that page, they will last all night.  Or there is GLOW Stones USA, which has a lovely picture of a driveway incorporating their glow in the dark stones.

Wednesday, September 4, 2013

Moon Melon


Moonmelon (scientifically knows as asidus). This fruit grows in some parts of Japan and is known for its vibrant blue colour. This fruit's party trick is that it can switch flavours after you eat it. Everything sour will taste sweet, everything salty will taste bitter, and it gives water a strong orange-like taste!

This magical Moon Melon does not exist.  Many other websites have decried the photo as being photoshopped:


It's too bad - a beautiful blue watermelon with the ability to fool your taste buds would be pretty cool.

Monday, September 2, 2013

Lace Tape


GENIUS: Take lace and put it on transparent tape. Great gift wrap idea or decoration for presents. #Gift_Wrap #Ribbon #Lace_Ribbon_Tape


This post inspired me to add my first label to this blog.  There are way too many pins out there that say "GENIUS" which are, let's say, less brilliant than that.

This pin heavily implies that you can achieve results like the picture by laying lace on tape and then using that tape for gift wrapping or other decoration.  While that could work, it's unlikely that using lace that is nearly the width of your tape and which is also that dense would result in tape that was sticky enough to work.  And if you look closely at this picture, you can tell that the lace is printed on the tape; lace has not actually been affixed to the tape.

Maybe if you glued the lace to the non-sticky part of the tape it might work, but then if you rolled it back up (like this picture) you'd end up getting the lace stuck to the rest of your tape and it'd probably end up getting linty.

If you really want lace tape, it's probably best to go ahead and buy it from the Etsy seller who posted this picture in the first place (or numerous other sources).

Friday, August 30, 2013

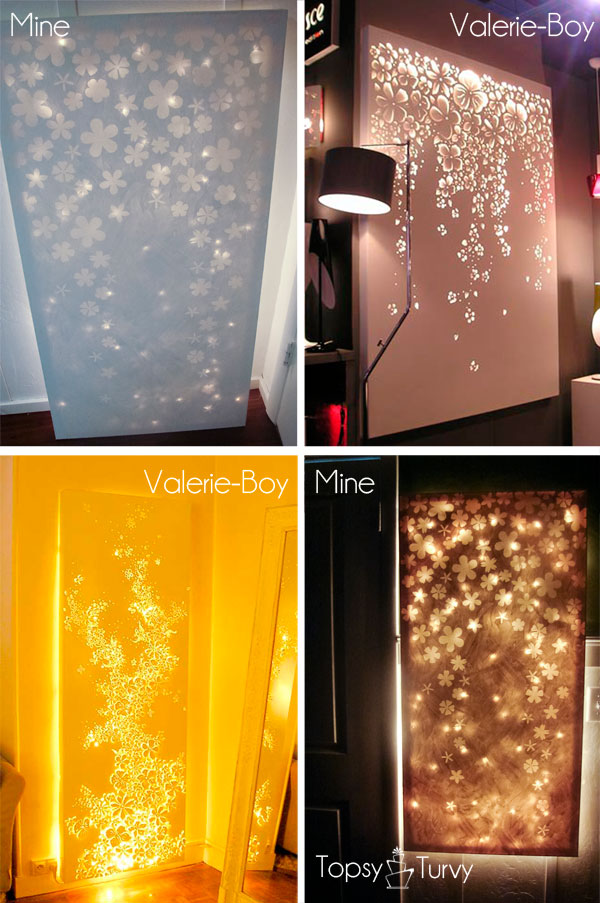
Stickers and Paint on Canvas

Stickers and paint on canvas is equiavalent to precision-cut metal, right?  No?


I love this-- use ANY canvas, apply stickers, decal, etc., and spray paint. Remove Decals; hang white lights behind it.


DIY Lighting...use tall canvas, apply stickers, decal, etc., and spray paint. Remove Decals; hang white lights behind it. >> Fun idea, love the possibilities!


Sadly, the art in these pictures is not the result of stickers, decals, or stencils.  These lovely lighted sculptures are made of cut metal.  If you look closely, you can see how the surface of the flowers is raised, rather than just a flat canvas.  Also, you can see gradients and shading that are the result of the 3D metal pieces from the cuts, and which are not achievable through the 2D application and removal of stickers.

Someone did attempt the sticker/spraypaint/peel method, though, and while the results are not the same as the metal installations above, I think it came out really nicely.  Check out the upper left and lower right below:


See the full post at Topsy Turvy for more!

Wednesday, August 28, 2013

Elmer's Glue, It Ain't

Today is a two-fer!  First up, we have:


Elmer's glue on canvas. Then paint the whole thing one color.

Lovely, isn't it?  Is it Elmer's Glue?  Nope.  It's puffy paint.  The artist traced the design they wanted on waxed paper first, peeled them off, then modpodged those shapes onto the canvas.  Clever technique and it came out looking sharp!  And it's definitely not Elmer's glue. Some pinner decided to put that in all on their own.  Maybe they thought it would work, maybe it was just a note for their own use, or maybe they didn't read the actual post and just assumed that's what it was.  Who knows what lurks in the hearts of pinners who post these things that are so far from the truth? Maybe they're hunting for re-pins?  If so, it's working.

This pin in all of its variations is so popular that the Elmer's Glue myth has made its way back to the original source.  If you click through the pin (and then hunt around, because BONUS!  This pin doesn't have exactly the right URL), the blogger has added an update saying that glue does not work.   She's gotten a LOT of comments from disappointed pinners and it's in no way her fault!  Something to consider if you're pinning and inventing descriptions to go with cool pictures you find...

If you're looking for the original super cool project, check it out at Virginia & Charlie.  


For the second part of today's post, we have:


This is REALLY cool!!! All you have to do is get watercolor paper. Then sketch your drawing,outline your sketch in Elmer's glue then paint it with water colors! SO fun!

As you've probably guessed, this one doesn't actually use Elmer's Glue either.  The picture shown with this pin displays an embossed page.

Tracking down what looks like the original (or one of the original) versions of this pin brought way more amusement than usual, when I discovered some hilarious reactions from commenters who took the time to click through to the pin's URL.  Some questioned the original pinner's reading skills, others simply offered the information that the project required an embosser.  But then I ran across this gem: "Embosser can auto correct to Elmer's glue if spelt wrong. It's all autocorrect's fault."  

Well played, commenter, well played.


Monday, August 26, 2013

Make Your Own Glowstick With Mountain Dew


Leave 1/4 of Mountain dew in bottle, add a tiny bit of baking soda and 3 caps of peroxide. Put the lid on and shake - walla! Homemade glow stick (bottle) solution.

And there's a video showing how to do it, which I cannot embed here because they've disabled that.

This would be so cool if it were true. Unfortunately, it's false. Really false.

You cannot get the glowing effect without dumping the contents of a glowstick in there. Sorry, but Mountain Dew is not magical, and it won't let you make homemade glowstick solution.